WordPress powers 32% of the web (per WordPress.org) and is famous for being free, open source software that users without any coding experience, as well as professional developers, can leverage to create amazing websites for themselves or their clients. It has a huge passionate community supporting it, who share tips and resources in forums, during in-person meetups, on videos, and in podcasts, etc. One reason developers love WordPress is that it is extendable and totally customizable, so your imagination is the limit.
I’ve been a WordPress fan for years, and I obviously enjoy digging into the code and customizing my sites (like my Codified Concepts, LLC, site that uses my own custom theme). But HTML, CSS, and PHP aren’t accessible to my elementary-age kids yet. However, as I was preparing to teach my kids to code, I found a similar community feeling, open source energy, and creative explosion in Scratch!
Just like WordPress, Scratch is free, open source software. Developed at the MIT Media Lab, this graphical programming language uses a drag and drop interface that allows users of all ages (including emerging readers) to express themselves through code, extending the project as far as their imagination can take them.
Used in over 150 countries, just like the WordPress community that has sprung up to engage and educate, Scratch is built around the idea of community. Each shared Scratch project is automatically open source, as anyone can look inside to learn and comment. Those who are passionate about showing the next generation how to code, find a happy home with Scratch. Groups of hardworking individuals like Scratch educators help users (i.e., students) learn how to work with the program and develop their computational thinking, collaboration, logic, and problem-solving skills, as well as their creativity.
Key programming concepts like loops and conditional statements used by WordPress theme developers are also used with Scratch. And techniques used by professional developers such as reusing or re-purposing code, iterating on your work, and learning from and modifying the code of others (known as “forking code” in the professional world, but called a “remix” in Scratch) are all employed by Scratchers.
As with WordPress, the more you learn about coding, the more detailed and expansive your projects can get. Just like WordPress users take advantage of plugins to extend the functionality of their site, users on Scratch can employ extensions like video sensing, text to speech, and translation services, as well as the ability to connect with physical devices (like a micro:bit or Lego robots) to bring the experience off the screen. And just like a plugin developer community exists within the WordPress community, Scratch has a group for extension developers!
When I build WordPress sites, I consider the accessibility of the site for my front end users. Though I’m by no means an accessibility expert yet, even making small changes to start (like adding alt text to each image and labels to icon-only menus) is a step in the right direction. Scratchers creating games can and should also keep accessibility in mind. For instance, can someone playing your game use a mouse or a keyboard? We want the web to be open to all, and we can help get it there by considering all our users when we build in WordPress or in Scratch.
When I think about the users of my sites, I also consider how they’ll be accessing and interacting with the site. A chief concern of mine is making the site responsive, so users on a phone, tablet, or desktop all have a positive experience. I think about where my users will click and how they might “break” my site (for instance, view it on a screen size that makes the layout wonky) and then I try to account for as many scenarios as I can. I take the same approach when I’m building my Scratch projects. I do some user testing! My kids are great user testers because they always try something I hadn’t anticipated.
My website development process always starts locally, or on a staging site, because I want the option to user test, try plugins, and refine before my sites go public. I wrote a whole article about what local development is and why it is a good idea for Skillcrush, but one of the great things about developing locally is I don’t necessarily need an internet connection and I can test things out of view of my visitors. The same option exists for Scratchers who can use the offline editor to flesh out their ideas until ready for their big reveal! Likewise, staging sites allow one to finesse a website online but out of view of front-end users. Scratchers with internet access have the option of creating a project but not sharing it until it is ready, keeping it private just to their account.
WordPress began as a blogging platform but has grown into supporting sites of all kinds. Just like WordPress isn’t limited to blogging, Scratch isn’t just for building games. Sure, creating games is a popular option for Scratchers, just like WordPress users often love to blog. But Scratch can be tied into other disciplines like art, math, creative writing, social studies… For instance, you can use Scratch to tell narrative stories, like the following project I created about why kids should learn to code: (If you are new to Scratch, you just need to remember to click the green flag to start the program. Also note, you may need to allow Flash. When Scratch 3.0 is released in January 2019, however, Flash will not be necessary.)
You can also view the project and see inside to view my code here: https://scratch.mit.edu/projects/262444306.
Teaching kids to code is about more than just having them learn a programming language or two. It isn’t even about kids filling the growing number of tech jobs when they launch their careers (though that would be a great outcome!). Learning to code is really a vehicle to teach computational thinking skills. It can help your child learn to problem solve, understand how to work through frustration, experience collaborating and communicating with others, and practice breaking processes down into smaller, manageable steps. These are important life skills to grasp as early as possible. No wonder it’s popular!
I’ve been enjoying my journey with Scratch and teaching my kids, and I’m excited to bring lessons to my local community and kids outside of my community, via virtual learning opportunities. If you love WordPress or you just want to introduce coding to your family, you should give Scratch a look.
Scratch Tutorial: Robot Builds a Sandcastle
by Maren Vernon
(This tutorial assumes that your child is comfortable using a keyboard and mouse. But if they need a little extra practice with those tools first, some practice exercises with the mouse can be found here and here. And typing practice can be found here and here.)
Computers do four things:
- they receive input,
- they store information,
- they process information,
- and then they output something.
When you program a computer, you are giving the computer a set of instructions to follow to complete a task, once it receives some input. Some examples of input could be typing a command on the keyboard, clicking somewhere on the screen with a mouse, talking into the computer with a microphone, or moving (like raising your hand up and down) so a motion sensing device can tell the computer you are moving and how. We are going to talk to the computer using Scratch, so let open up a new Scratch project. (Images shown below are from the Scratch 3.0 beta.*) You don’t have to set up a user account to work on a project, but if your child wants to save and share their work, a parent/guardian will need to start a free account for their child linked to the parent’s email address. (More information can be found here.)
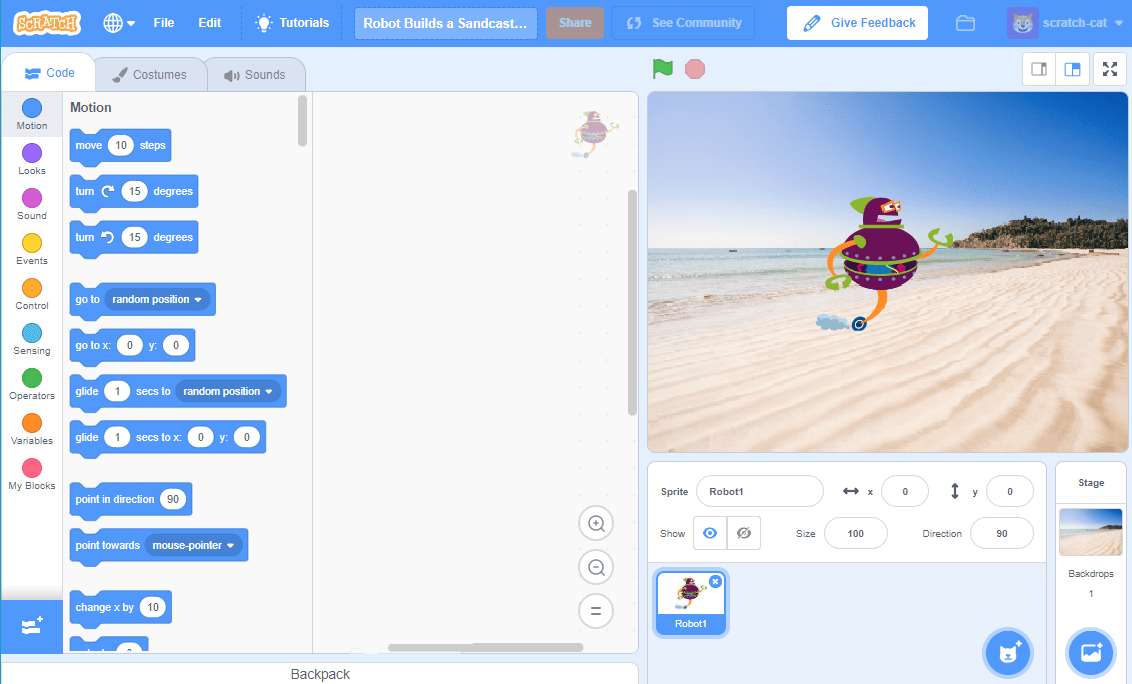
Do you see the cat character? In Scratch, any character that you can program is called a sprite, and each new Scratch project starts with the Scratch cat sprite on a white background. That part of the screen is called the stage, because it is where your sprites will perform their tasks, just like an actor on a stage. We can change the sprites we use and the background. A book my kids and I love that introduced them to some fundamental coding concepts is How to Build a Sandcastle by Josh Funk. So in honor of that book, we are going to program a robot sprite on a beach to move back and forth on the screen and maybe have it ask where it should go to start building the sandcastle. That is our desired output.
Before we write any code, however, you want to ask yourself some key questions to help you analyze and decompose the problem. So let’s get out some scratch paper and write down some questions and answers:
- Where do I want to build the sandcastle? What is the scene/background?
- Who is building the sandcastle? What is the character/sprite, or sprites, we need?
- What is my desired output? What do I want to have happen?
Our first question was, “Where do I want to build the sandcastle?” So first, let’s get to the beach! You can choose a backdrop from the library (using the picture icon) and use one of the beach backgrounds already provided. Or add your own by uploading a backdrop image from a file. I added a beach photo from the image site Pexels, but you could also upload a great shot from your latest beach vacation!
Our second question was, “Who is building the sandcastle?” The Scratch cat is fun, but to stay true to the book, you’ll want a robot sprite. Choose a robot sprite from the library (by clicking a face with pointy hair in Scratch 2.0). Now we can delete the cat sprite (right click to delete in 2.0).
Before we move on, save! You should get into the habit of saving your work regularly. I won’t remind you to save after each step coming up, but it is great idea to save each time you’ve made a few changes.
With Scratch, we are going to “drag and drop” coding blocks, which are individual small instructions, onto the scripts area and connect them together in the proper sequence (the proper order) to create a script for the sprite. A script is the group of commands that tells the sprite what to do. And sprites can have one or more scripts. Look for the blocks palette (in the center of the screen in 2.0, and on the left in 3.0). Do you see the different colors listed on the menu? Each color is for a different type of code block.
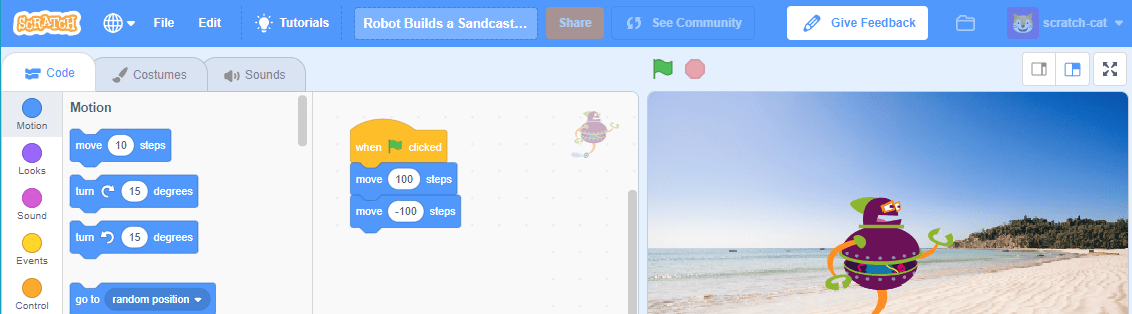
When you talk to a computer, it needs very specific instructions. So the first thing we said the computer does is receive input. It needs to know how we’ll tell it to start running our script. Let’s add the “when green flag clicked” block to the script area. It is one of the yellow event blocks. Now that we’ve told the computer the input, let’s start writing our move instructions. We can start with a blue motion block that says, “move ten steps.”
Do you see the hump on the top of the “when green flag clicked” block? This is called a “hat block.” That hat tells us that is an input block, so nothing comes before it. It is designed to start a script. But the bump underneath can fit into the notch on the top of the “move ten steps” block. This type of block is called a “stack block.” You’ll see this one has a bump on the bottom as well, so it can connect to another block if we want. The hat, bumps, and notches help us see how blocks can connect to other blocks. (And there are other block shapes you can explore later as you get more familiar with coding in Scratch.)
Connected blocks can be dragged and dropped together as a unit when you click on the first block in the script. To break up connected blocks, click on the block you want to break off and drag it away from the ones above it. Any blocks connected beneath will move with it, so you’ll want to break those off and reconnect them to the original script, should you desire that. To add blocks between blocks, drag the new block between them until you see the white indicator showing where it will be added. If you have a block or group of blocks you didn’t want anymore, you can drag it back to the blocks palette and it will be deleted.
So, we’ll snap these blocks together to make a script, and when we click on the green flag, the sprite moves 10 steps. To tell the sprite to move in the correct direction using this block, we need to figure out the direction the sprite is facing. The computer doesn’t understand “facing up,” “facing down,” “facing forward,” “facing left”… It understands direction by the number of degrees. Zero degrees means the sprite is facing up. Ninety degrees is facing to the right, etc. Each sprite can have a few drawings associated with it. Each of these drawings is called a costume (seen under the costumes tab). Some costumes make it easy to tell the direction, and others are harder. We can look at the sprite information, and there it tells us the degree the sprite is currently at. If it is facing 90 degrees, it will move to the right if we assigned it move instructions until we add code to change the direction.
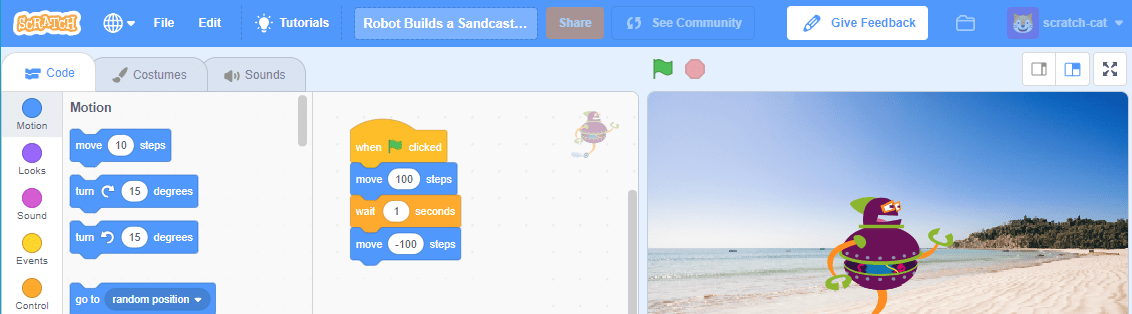
Each “step” is equal to one-pixel length. Pixels (px) are small, so bigger numbers mean more obvious moves. Negative numbers will move the sprite the opposite way (backward/to the left). So 100 moves the sprite 100px to the right, and -100 moves the sprite 100px to the left. You can change the number in the block by clicking on it until it is editable. Let’s add another move block to have the robot go backward 100 steps (-100) after it goes forward.
Let’s run the completed script by clicking on the green flag. Wait…what happened? Is the code not working? Well, computers are fast! The sprite is moving so fast our eyes can’t see all the steps, so let’s slow these steps down. Under the control blocks, you can add the option to wait. Let’s add a wait of one second between these move commands.
Let’s run the script again. Much better, right?
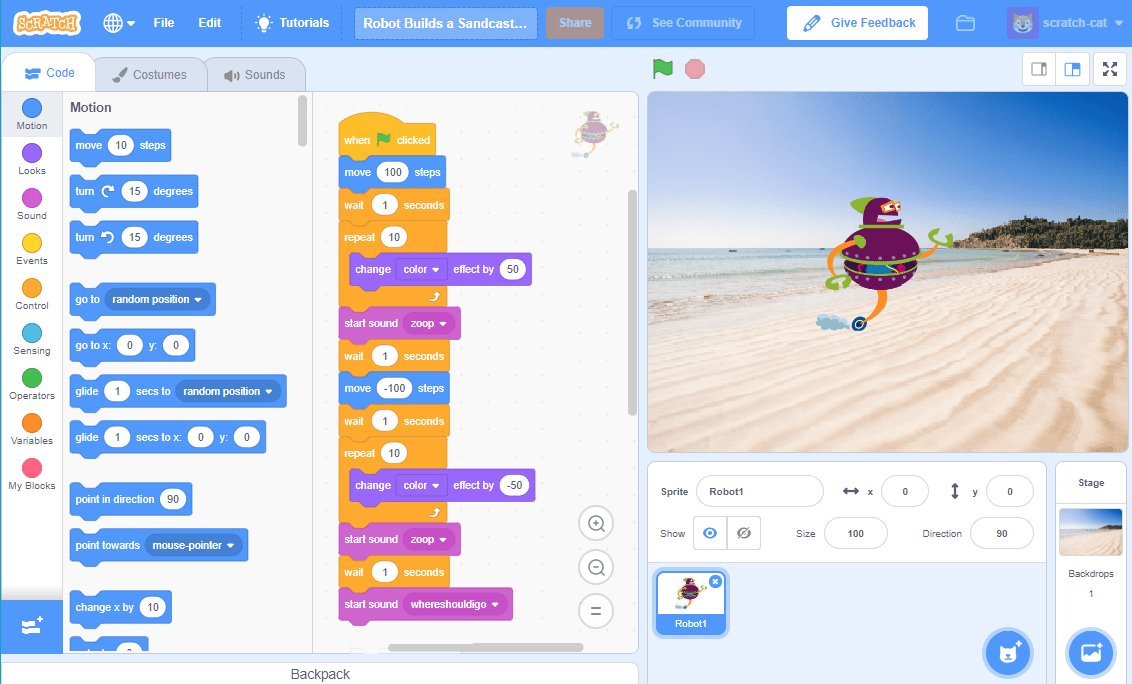
It’s cool to tell a robot what to do, right? Now that you know a little bit about how to use Scratch and how to move a sprite around on the stage, you can start to explore a lot of other fun coding blocks that do different things. Let your imagination go wild and add a little pizazz. My suggestion? This image below shows some fun blocks to try. You’ll notice this includes a loop for the color change (in the form of a repeat block; loops are a key coding concept) and also some fun sounds. Did you know you can record your own sounds? Click on the “Sounds” tab and click to record. Use your best robot impression to say, “Where should I go?” (or add some robotic effects to your recorded sound in Scratch 3.0).
When coding, there are often lots of ways to get to the same output. For instance, we’ve been using the “move steps” block but we could also use blocks dealing with Cartesian coordinates/the X-axis and Y-axis.
The rule for developers is code a bit and then test, then code a bit more and then test, and then code and test… It isn’t about being perfect. It is about having fun and experimenting! You can always iterate on your work as you get more familiar with the coding blocks and concepts.
I hope you enjoyed this simple getting started tutorial and you’ll try out Scratch with your child! If you’d like to see a live version of the project I created with this tutorial, you can find it here.
Please come by my Scratch profile page to see some of the other projects I’ve been working on. You can find me online sharing coding tips, book favorites, etc., on Instagram, Twitter, and Facebook. Or you can contact me here.
* Until Scratch 3.0 is released in January 2019, you can try the beta here or create a project using the current Scratch 2.0. Projects and user accounts will automatically move over to Scratch 3.0 when it is released. You cannot currently save projects created on the beta to your Scratch account, but you can download those projects to your computer to save them. There are also some slight differences in the location/manner of sprite and background selection, etc., but the coding blocks will remain and operate the same and the overall interface will be familiar in 3.0 for users of 2.0.
Troubleshooting Tips
Before I let you go, I also have a few troubleshooting tips for you. Have you encountered some issues while practicing these steps? Here are my pieces of advice:
- Make sure not to leave your mouse hovering over the green flag after you click it to run your script.
- If the online Scratch editor freezes on you, one way to break the spell is to zoom in and out on the browser window by clicking on those commands, or pressing CTRL + and CTRL – on a PC, or Command + and Command – on a Mac. Another option is to click in the upper right where “Save Now” would be and then refresh the screen. While it may not be responding because you opened a new tab or new browser window in the middle of working on your project, it is generally still recording your actions.
- Right-clicking and choosing delete within a set of connected blocks will delete the selected block and all connected blocks that follow it (in nested elements, it will delete the blocks that follow within that nested group). You’ll need to break up connected blocks to remove a piece between others and then reconnect the blocks you still want. If you accidentally delete a block(s), you’ll notice there is no “undo.” Instead you can select Edit > Undelete. But you can only use this to undelete the very last block you deleted.
- If your window is getting messy, right-click the window and select “clean up” to organize your scripts.